Code name "Poodle" vulnerability

This vulnerability might be another that will cause some changes on the internet.
It seems that uses the fallback to 3.0 to create a man in the middle opportunity to disclosure information.

This is a interesting paper about it.
Solution at the moment is disable SSL 3.0, this might create problems with legacy users or users that have older browsers because they might not be able to access the site.
It might have a positive side, force everybody to use safer protocols. 🙂 and recent clients.

More information here:
https://www.openssl.org/~bodo/ssl-poodle.pdf

How to check if you are secure suing mmap
nmap –script ssl-cert,ssl-enum-ciphers -p 443,465,993,995 www.hjfr-info.com

How to check if you are secure using openssl
openssl s_client -connect www.hjfr-info.com:443

Sandworm…

It seems that a new vulnerability on SSL is being used on spy games to the west. 🙂

This information was disclosure by the http://www.isightpartners.com/2014/10/cve-2014-4114/

For what is told on the internet has soon has Microsoft releases the patch, more info on it will be delivered about it.

The vulnerability code:
cve-2014-4114

Configure a default gateway in a CISCO router (gateway of last resource)

Default routes are used to direct packets addressed to networks not explicitly listed in the routing table.

There are 3 possibilities to configure this.

  1. ip default-gateway
  2. ip default-network
  3. and ip route 0.0.0.0 0.0.0.0

Lets start by the first.

1 – The ip default-gateway command differs from the other two commands. It should only be used when ip routing is not enabled on the Cisco router.

For instance, if the router is a host in the IP world, you can use this command to define a default gateway for it. You might also use this command when your low-end Cisco router is in boot mode in order to upload a Cisco IOS Software image to the router.

In boot mode, the router does not have ip routing enabled.

2 – you can use ip default-network when ip routing is active on the Cisco router. When you configure ip default-network the router considers routes to that network for installation as the gateway of last resort on the router.

HJFR_Router#configure terminal
HJFR_Router#ip route 170.70.24.0 255.255.255.0 131.108.99.2
HJFR_Router(config)#ip default-network 170.70.0.0
HJFR_Router(config)#^Z

HJFR_Router#show ip route

Codes: C - connected, S - static, I - IGRP, R - RIP, M - mobile, B - BGP
       D - EIGRP, EX - EIGRP external, O - OSPF, IA - OSPF inter area
       N1 - OSPF NSSA external type 1, N2 - OSPF NSSA external type 2
       E1 - OSPF external type 1, E2 - OSPF external type 2, E - EGP
       i - IS-IS, su - IS-IS summary, L1 - IS-IS level-1, L2 - IS-IS level-2
       ia - IS-IS inter area, * - candidate default, U - per-user static route
       o - ODR, P - periodic downloaded static route

Gateway of last resort is 170.70.24.0 to network 170.70.0.0

 *   170.70.0.0/16 is variably subnetted, 2 subnets, 2 masks
S*      170.70.0.0/16 [1/0] via 170.70.24.0
S       170.70.24.0/24 [1/0] via 131.108.99.2
     161.44.0.0/24 is subnetted, 1 subnets
C       161.44.192.0 is directly connected, Ethernet0
     131.108.0.0/24 is subnetted, 1 subnets
C       131.108.99.0 is directly connected, Serial0
S*   198.10.1.0/24 [1/0] via 161.44.192.2

3 – Creating a static route to network 0.0.0.0 0.0.0.0 is another way to set the gateway of last resort on a router. As with the ip default-network command, using the static route to 0.0.0.0 is not dependent on any routing protocols. However, ip routing has to be enabled on the router.

Note: IGRP does not understand a route to 0.0.0.0. Therefore, it cannot propagate default routes created using the ip route 0.0.0.0 0.0.0.0 command. Use the ip default-network command to have IGRP propagate a default route.

EIGRP propagates a route to network 0.0.0.0, but the static route has to be redistributed into the routing protocol.

In earlier versions of RIP, the default route created using the ip route 0.0.0.0 0.0.0.0 was automatically advertised by RIP routers. In Cisco IOS Software Release 12.0T and later, RIP does not advertise the default route if the route is not learned via RIP. It might be necessary to redistribute the route into RIP.

OSPF and IS-IS does not propagate the default routes created by the command: ip route 0.0.0.0 0.0.0.0. Additionally, this default route can not be redistributed into OSPF or IS-IS using the redistribute command.

Use the default-information originate command to generate a default route into an IS-IS or OSPF routing domain.

HJFR_Router#configure terminal
HJFR_Router(config)#ip route 0.0.0.0 0.0.0.0 170.170.3.4
HJFR_Router(config)#^Z
HJFR_Router#

HJFR_Router#show ip route
 Codes: C - connected, S - static, I - IGRP, R - RIP, M - mobile, B - BGP
 D - EIGRP, EX - EIGRP external, O - OSPF, IA - OSPF inter area
 N1 - OSPF NSSA external type 1, N2 - OSPF NSSA external type 2
 E1 - OSPF external type 1, E2 - OSPF external type 2, E - EGP
 i - IS-IS, L1 - IS-IS level-1, L2 - IS-IS level-2, * - candidate default
 U - per-user static route, o - ODR

Gateway of last resort is 170.170.3.4 to network 0.0.0.0
170.170.0.0/24 is subnetted, 2 subnets
C 170.170.2.0 is directly connected, Serial0
C 170.170.3.0 is directly connected, Ethernet0
S* 0.0.0.0/0 [1/0] via 170.170.3.4
HJFR_Rotuer#

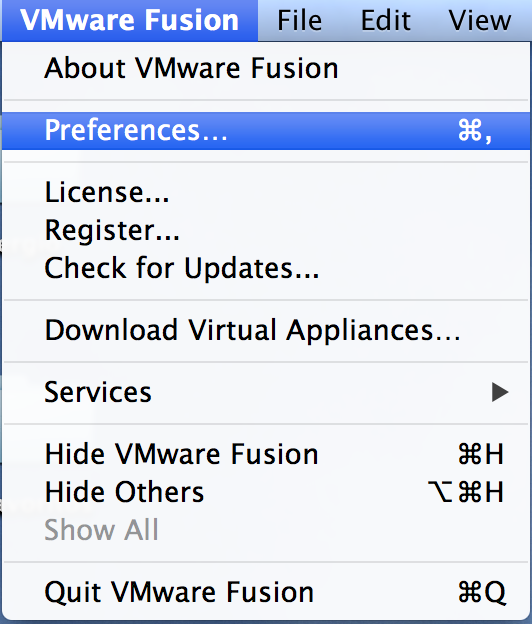
Table to help Subnetting

This table has the goal to make the manual subnet calculation more easy and fast. It gives us the number of bits necessary or the number of hosts depending on the needs.

Number of necessary bits for H 8 7 6 5 4 3 2 1
Number of Hosts 256 128 64 32 16 8 4 2 NA
Number of necessary Bits for N 1 2 3 4 5 6 7 8
Value of “Subnet Mask” 0 128 192 224 240 248 252 254 255
Number of Valid Networks 1 2 4 8 16 32 64 128 N/A


The Number of host is the total amount of hosts, valid and invalid.

e.g.:

We want to know the value of a subnet to host 10 machines.
To meet that aim our network administrator gives us the following network 192.168.1.0 to subnet.

Classical way is:

To host 10 machines we will need to use the following calculation formula: 2^n-2=10 being N the number of bits that we will need.

N=4

2^4-2 = 14

So to meet the goal our binary octet should look like this:

NNNNHHHH

4 Bits for Networking (N) and 4 bits for Hosts (H).

Our network would have a subnet mask of: 2^7+2^6+2^5+2^4=128+64+32+16=240

Numbers translated:

2^7 is the value of the firs N from left to right.

2^6 is the Value of the second N from left to right.

2^5 is the value of the Third N from left to right

2^4 is the value of the Fourth N from left to Right

Now Lets see how the table can make this faster:

First we need 10 hosts so it is necessary to search a value that is close to 10 but bigger.

So we see the value 16 Green also we could meet the number by searching the number of necessary bits 4.

Then we just go down in the column and check the values,  “Subnet Mask” 240  and the number of networks is 16.

Number of necessary bits for H 8 7 6 5 4 3 2 1
Number of Hosts 256 128 64 32 16 8 4 2 NA
Number of necessary bits for N 1 2 3 4 5 6 7 8
Value of “Subnet Mask” 0 128 192 224 240 248 252 254 255
Number of Subnets 1 2 4 8 16 32 64 128 N/A


Our network would be the 192.168.1.0 with the Mask 255.255.255.240 with the Network address of 192.168.1.0, first valid ip address 192.168.1.1 and the last valid ip address 192.168.1.14, the broadcast address will be the 192.168.1.15

Hope this helps everybody in their daily work.

Análise inicial de Malware.

Esta é uma apresentação que fiz há uns anos e que tem por objetivo mostrar como podemos fazer uma análise inicial de malware.

Serve para qualquer pessoa pelo menos ter um conhecimento adicional do malware que a infecta e ter informação necessária para poder realizar pesquisas e trocar conhecimento nos fóruns para o efeito.

Aqui fica o Vídeo e espero que seja útil.

www.hjfr-info.com/MyPresentations/AnaliseEstaticaBasicaMalware/index.html

Configure a personalised Network card on VmWare fusion.

One thing that has become more simpler with VMware.

The Network Creation.

The new VMware fusion PRO permits to create in a more easy way extra network cards.

This can be very useful if we need extra layers for our network and to build a LAB for whatever purpose that we need.

First of all we need to go to VMware Fusion menu and choose preferences.

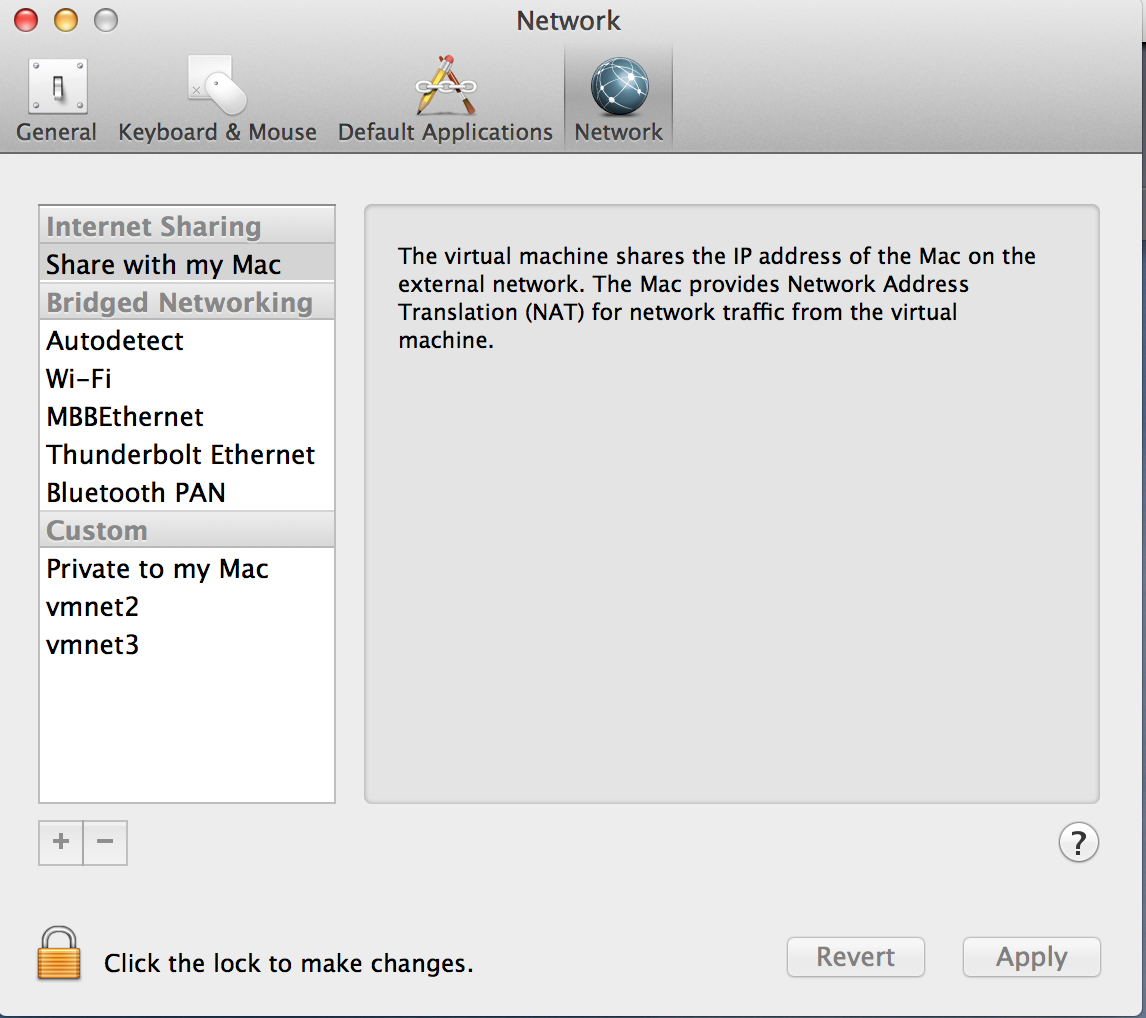
VMware PreferencesThen choose network menu.

It will open a window similar to the following.

VMware Network Menu


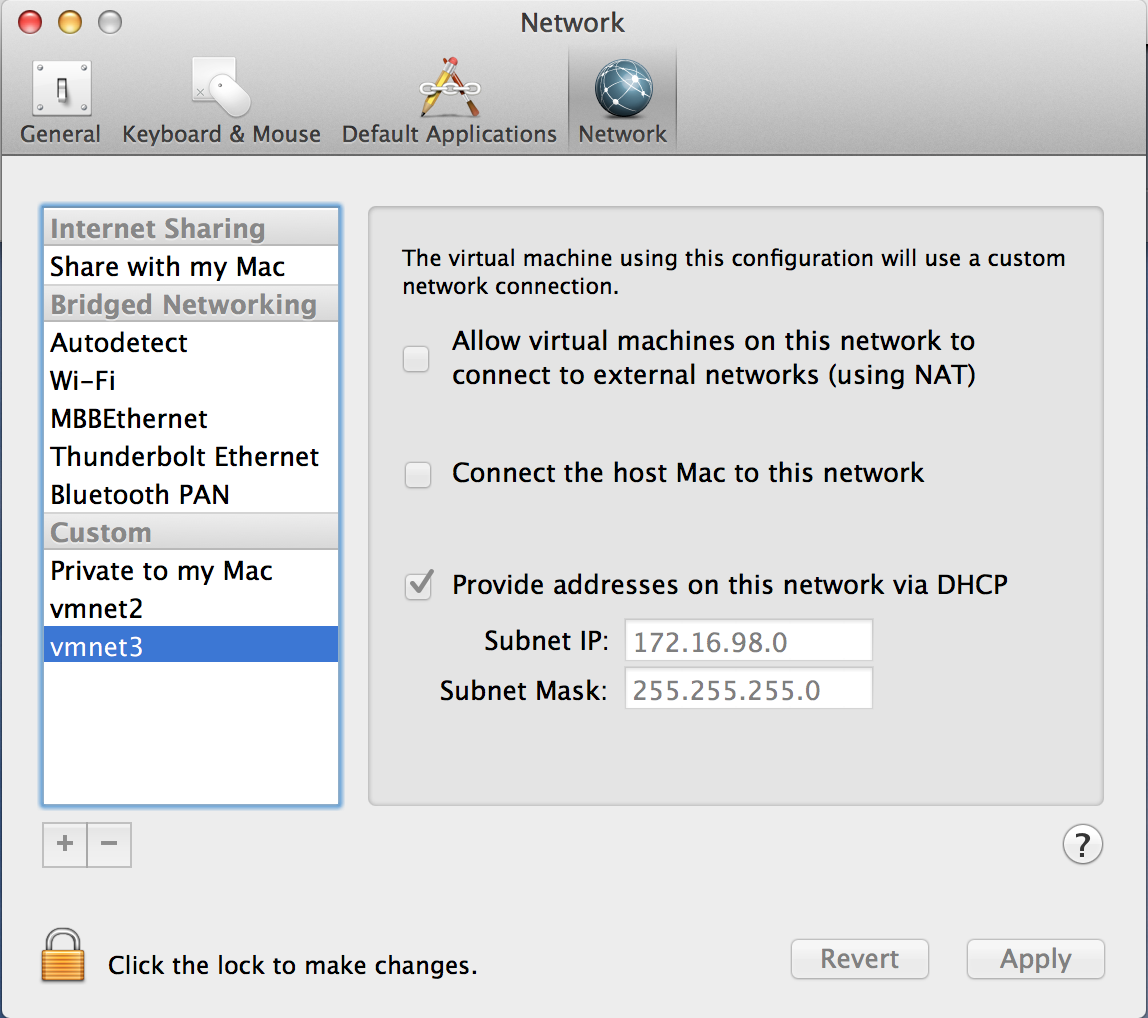
On the lower left we can unlock the padlock  to make changes and then press the plus sign on top of the padlock that will become available.

VMware New Network Interface

A new network will be created in this case is the vmnet3 and we can choose the IP address and the subnet.

We can also choose what is the type of if the interface that we want. The options are:

  1. Private network (Isolated from the MAC)
  2. Nat (Shared with the physical interface and hidden from outside)
  3. Shared with the host.  (permits access to host resources)

This is a very important diference from the normal VMware Fusion if we want to build a multilayer Lab.

Video here:

Configure a Custom network card in VMware Fusion PRO.

Http Request Methods, the point of view of a attacker…

Some times I have difficulties trying to convince the sysadmins of the HTTP Request Methods importance.

What type of methods we should have enabled on the servers and for what they can be used for.

This text will be to show the point of view of the attacker  when he finds more than the necessary methods.

What are the HTTP Request Methods?

The  HTTP Request Methods are:

  • GET
  • POST
  • HEAD
  • TRACE
  • OPTIONS
  • CONNECT
  • PUT (WebDAV)
  • DELETE (WebDAV)

The GET request method:

This method is used to request pages from the server, is similar to the POST request method, the diference is that it uses the url to pass parameters to the application.

Attacker Point of view:

Can be bookmarked with parameters that should not be there. (session tracking parameters, authentication related parameters e.g.:session id)
The request is logged in the server logs and might be problematic for disclosure of information in those logs. e.g.: Server admins can have authentication information of the clients.
easier to script against this method. Easier XSS attacks.

The POST request method:

This method is used to request pages from the server, it is similar to the GET request method, the diference is that it uses the HTTP payload to pass the parameters.

Attacker point of view:

Still able to be manipulated.
If the application supports method intercharge can be changed to a GET for simpler scripting. (register_globals is one way this happens in PHP)

If interchange is possible it might allow easier XSS attacks. (easier scripting)

HEADER Request Method:

Instructs the server to only respond with HTTP headers.

Attacker point of view:

Allows the Attacker to test requests without waiting for the payload. (the data that the attacker is looking must reside on the HTTP header).

TRACE Request Method

Trace echoes the request as seen by the server to the client.

Attacker Point of view:

It allows the attacker to see any changes made by intermediate servers such as proxy. Allows to see any pieces of information that are added by intermediaries like load balancers and proxy servers.

Maps the architecture.
Changes to the request may be made by inbound or outbound proxies or Load Balancers.

OPTIONS Request Method:

IT asks the server which HTTP request methods are supported.

Attacker point of view:

Easy method of knowing what is supported by the server.

CONNECT Request Method:

Creates a HTTP tunnel for requests.

Attacker Point of View:

It is used by proxies, if you know the resources there is a change of trying to abuse the proxy to get access to applications that we should not normally be able to access. Can be used to connect to other resources behind the proxy.

It is used to establish SSL connections.

PUT and DELETE Request Methods

Are used for WEB-Based distributed Authoring and Versioning. (WebDAV), should not be used in public web Servers. (WebDAV has many other methods that will remain out of scope on this article). PUT is used to upload data to the server, Delete to remove data from the server.

Attacker point of view:

Imagine we can delete .htaccess file, a place where normally are stored all the configs and ACLs for a site, the attacker could remove controls that block access to the application.
Use the PUT to upload malicious code that can be executed on clients or server side!

Always disable methods that are not needed for our business needs.

Hope this information is useful to someone.

Microsoft Kill 4 Millions of no-ip Domains

It seems that Microsoft in the fight against malware has exceeded his duties and went to a extreme.

The source of the news was:

http://krebsonsecurity.com/2014/07/microsoft-darkens-4mm-sites-in-malware-fight/

The attitude and the judge rule make me think a lot on this…

Some things that call my attention…

1 – How come a private company can seise the domains of other private company, when it seems that there is no proof of bad faith of the seized company…

2 – How come a court can rule in favor of a private company and give her the custody of the domains..

3 – How come the innocent users of no-ip.com get their traffic sniffed by a private company…

This makes me think that it is not only the thief’s that abuse of the internet but also the ones that should be protecting it.

Enabling account recovery for your SharePoint Workspace account

This Help article applies to SharePoint Workspace users whose accounts are hosted via Microsoft servers and not managed on a corporate domain. Typically, these are users who create their own accounts.

The account recovery option is enabled by default at account creation time. You may need to use the account recovery feature under the following circumstances:

  • You want to restore your account by opening an account backup file, but you have forgotten the password you set when you created the backup.

For security purposes, SharePoint Workspace prompts you to set a log-in password when you create an account backup file. When you open the account backup file to restore the account, you are prompted to enter this password. If you had “Enable account recovery” enabled in your account preferences, A “Forgot your password?” link displays in the password dialog box. If you click the link, an account reset code is sent to your e-mail address. You can use the account reset code in the Account Configuration Wizard to restore your account.

  • The Windows log-in on your system has been changed in a way that is not recognized by your SharePoint Workspace account.

Though this is a highly unusual circumstance, it also presents a serious issue if this is the only system on which you have your SharePoint Workspace account. In this case, if you have not enabled account recovery, you will be unable to recover your account. The only recourse is to create an entirely new account and then ask your contacts to re-invite you to your workspaces. You will be unable to recover workspaces in which you were the only member.

To enable account recovery:

  1. On the File tab, click Info, click Manage Account, and then click Account Preferences.
  2. Click the Account tab.
  3. Check Enable account recovery and click OK.