Configure Static IP Address on Linux

It is possible to configure a Linux network interface in multiple ways.

This is the one that might be simpler for beginners.

sudo ifconfig eth0 192.168.1.10 netmask 255.255.255.0;
sudo route add default gw 192.168.1.1 eth0;

ifconfig is an application that allows to configure a network interface.

In the above example sudo is the command that allows us to elevate the user privileges to configure the network interface.

eth0 is the available interface, the list of available interfaces can be listed using the command ifconfig.

192.168.1.10 is an example of a IP address it can be what you require to configure your network.

netmask identifies the subnet mask for the network that you are configuring. If you not sure what should be check the configuration settings of your router.

the second configuration line is the configuration of the default gateway. To achieve efficiency in getting out of the local network it is required to provide that information to the computer.

The gateway setting is the exit point of the local network to other networks. Route add is the command that it is used to add the route.

Default identifies that this is a default route. If no other route is inserted in the routing table the computer will use this route to speak with the remaining networks.

The address 192.168.1.1 is the ip address of the gateway normally the address of the router in a local network.

The eth0 is the local interface that will be used to reach the gateway.

How to Find Files With setuid Permissions

find directory -user root -perm -4000 -exec ls -ldb {} \; >/tmp/filename
  • find directory -> Checks all mounted paths starting at the specified directory, which can be root (/), sys, bin, or mail.
  • -user root -> Displays files owned only by root.
  • -perm -4000 -> Displays files only with permissions set to 4000.
  • -exec ls -ldb -> Displays the output of the find command in ls -ldb format.
  • >/tmp/filename -> Writes results to this file.

OpenWRT and Raspberry PI Access Point

Today I decided to build one personal access point for my travels.

I had one Raspberry PI 2 in my drawers and I decided to use it.

I wanted to prepare something fancy based on web environment and not in bash.

Trying to see what exists compatible with raspberry pi I have found OpenWRT…

I tried to install it and everything work well until I tried to put the wireless cards working. 🙁

The wi-fi did not start-up, I could not make it work…
Until I found I had to install some packages…

I have installed the hostapd package
I have installed the hostapd-common
I have installed the hostapd-utils

This is required to transform the device into an access point.

To install this packages I used the web interface.
Menu System -> Software

Finally I discovered that the network drivers did not exist, I have installed the drivers for the wireless network cards…

1
opkg install kmod-rt2800-lib kmod-rt2800-usb kmod-rt2x00-lib kmod-rt2x00-usb

The suddenly I have a new menu and I can see wi-fi networks… 🙁

But I am not still able to connect or able to advertise my SSID… 🙁

I Hope to be able to complete this post very soon with all the required steps.

INTRO TO BASH SHELL on MAC part 3

File Management

Working in bash will force us to understand file management and how to work with them.

Create Files

To create a folder / directory use the mkdir command the argument will be the folder name that you wish to create, you can use more than one argument and in that case it will create more than one folder.

touch command can be used to create files, like in the folders the argument is the file name. If you use more than one argument you will create more than one file.

Cat command outputs the content of a file to screen. It has no paging, if you open the wrong type of files your terminal might get mess up, you will need to use reset to make it return to initial state.

less also allows you to see the content of a command, the difference is that this command will allow us to search contents or move up or down in the file.

Less command also tries to identify the type of file.

Open command can be used to open a file with the program that is associated to it. This command will open the file in the graphic mode so you will leave bash.

open .

The command “file” will tell you what type of the file is, this will allow you to understand if the file is a picture or a binary file for example.

Remember that the extension is not mandatory in the shell.

Use the “TAB” key for autocomplete

Working with Files

rm is remove command

mv is move command

In Mac OS the file names are not case sensitive. This is a difference between Linux and OSx

File names can contain almost any character except the “/”

Advises for file names:

  • Use only letters and numbers if you use multiple words use a “-” or “_” as a separator
  • Use only lower case characters
  • Avoid using spaces specially if they are in the end of the file.
  • Avoid using the following characters
    • `
    • *
    • #
    • !
    • $
    • ?
    • @
    • &
    • |
    • { }
    • ( )
    • : ;
    • \
    • < >
    • “TAB”
    • “SPACE”
    • “DELETE”
    • “BACKSPACE”

If we have file names with this previous characters we need to use an escape character.

  1. Backslash ( \ ) is the escape character and it can escape a single character.
  2. Single quotes (‘ ‘) can escape all characters between them

Path types

There are 2 types of file paths, relative and absolute paths.

Absolute paths normally start with a “/” or with a “.

Example: /var/log

Relative paths

They do not start with a “/” or “.” and are resolved to a working directory.

Example: cd ~ will send us to the current user home path.

Handling Files and Folders

To copy files we use the command “cp” that stands for copy.

You can use now the “man cp” to know what you can do with the command. If you notice the command takes 2 arguments where the first argument is the Origin and the second argument is the destination.

It also can take multiple arguments as sources to one destination.

cp command will silently overwrite existing files.

To copy directories and the contents we need to use the option -R that states for recursively.

The command will be similar to the files “cp -R Origin Destination”

Like files we can also use multiple sources to one or multiple destinations.

Another command to deal with Files and Folders is the “mv” command that states for moving.

Like the copy command we need also 2 arguments, one for origin and another to destination.

Use the “man mv” to get more information about the command and his arguments and options.

Files can be deleted with the “rm” command, that stands for remove.

The command can receive one or more arguments that are the list of the files or folders to remove.

Because removing the files is permanent we can use the -i option, that will ask us to confirm for each file to remove.

The “-i” option can also be used for other commands.

INTRO TO BASH SHELL on MAC part 2

In the part 1 of this learning topic you had one introductory approach to BASH in this part we will go deeper in the knowledge of BASH in MAC OS

Now that we know how to open a terminal window in a MAC we will need to confirm that we are really running bash on that window.
For that it is required to execute a simple command.

The command bellow will check if we are running bash.

echo $BASH

Notice that if you do not use the capitals in “BASH” you will not get the return.

If your output is not “/bin/bash” then install and enable BASH in your machine.

Command Arguments

A command is a word that is written in the shell.

In the previous example the command is “echo”.

Everything that comes after the command is called argument.

In the previous example “$BASH” is the argument for the command echo.

Options

If an argument starts with a  ” – ” then it is considered an option.

Examples:

  • ls -a
  • ls -l
  • ls -la

In this example the command is “ls” that corresponds to list and the -a is the option that instructs ls command to list all the files including the ones that are hidden, -l is the option that instructs the command to list the files in long format.

Help

The commands might have several options available. To list those options or to know how to use the commands we can call the manual for that command.

For that we use the command “man” and then as argument the name of the command that we wish to receive help for.

This will open the manual page for the specified command.

Space key will move down a page, “b” will move back a page.

Search will be done with the “/” and exit with “q”

Test this new commands and pay attention to the differences in the output.

INTRO TO BASH SHELL on MAC – Part 1

Bash is a shell that exists on all Linux machines and in apple machines also.

You can’t not start it directly, or find any many with bash, to run bash you need to simply run a terminal emulator.

That terminal emulator runs bash inside it.

This video shows where you need to go to open a terminal window inside finder.

What you see when you opened it is what we call bash prompt.
The Prompt is where we can call the bash commands.
All commands should be followed by enter key. This enter key is what forces the machine to read my stings and execute them accordingly.
If the machine does not recognizes my strings as a command it will return an error of command not found.

The prompt can be 100% configurable.

The one that is listed on the video is reconfigured but all the basic is present there.

Lets take a look at the prompt.

In the video you will identify the following things in the command prompt:

  • The logged on user
  • The name of the machine where the user is logged on
  • The path where the user is
  • And the command line space.

For that we had to use several commands, the commands will be spoken a bit latter for now I just want to list them and give a introduction.

  • cd – stands for Change directory it is used to change from one directory to another.
  • pwd – stands for Print Working Directory and it is used to show us where we are.
  • ls – stands for list segments and it is used to list files and directories


And you can think of the current working directory as the location you are currently at.

Navigate a bit though your file system using the ” CD ” and ” CD .. ” and the other commands that were used on the video to see where you are, and list contents.

You will have different contents than me for sure.

Make yourself comfortable because this will be very useful for the future.

Log Types inside /Var/log

This post is for the persons that wish to start understanding the log structure or need to spend lots of time checking logs or trying to analyse what happen in a Linux system.

For them it is vital importance to know what logs exist and what information they can give us.

Most of the logs in Linux environments exist inside the /var/log folders.

This is a list with brief description of what we can find and why they are useful…

While your system is running smoothly try to check the logs and try to understand the existing data and how it might be useful for you.

This will be of valuable importance if something wrong happens and might help you a lot in a crisis.

  1. /var/log/messages – Contains global system messages. Including startup messages. This logs include information from several things like: mail, cron, deamon, kern, auth etc.
  2. /var/log/dmesg – /var/log/dmesg – Contains kernel ring buffer information. When the system boots up, it prints number of messages on the screen that displays information about the hardware devices that the kernel detects during boot process. These messages are available in kernel ring buffer and when the new message comes the old message gets overwritten. You can also view his contents of this file using the dmesg command.
  3. /var/log/auth.log – Contains system authorisation information, including user logins and authentication mechanism that was used.
  4. /var/log/boot.log – Contains information that is logged when the system boots
  5. /var/log/daemon.log – Contains information logged by the various background daemons that are running on the system.
  6. /var/log/dpkg.log – Contains information that is logged when a package is installed or removed using package manager command. (Debian Based systems)
  7. /var/log/kern.log – Contains information logged by the kernel. Helpful for you to troubleshoot a custom-built kernel.
  8. /var/log/lastlog – Displays the recent login information for all the users. This is not an ascii file. You should use lastlog command to view the content of this file.
  9. /var/log/maillog || /var/log/mail.log – Contains the log information from the mail server that is running on the system. (Sendmail logs information about all the forward items to this file).
  10. /var/log/user.log – Contains information about all user level logs.
  11. /var/log/Xorg.x.log – Log messages from the X
  12. /var/log/alternatives.log – Information by the update-alternatives is logged into this log file. On Ubuntu, update-alternatives maintains symbolic links determining default commands.
  13. /var/log/btmp – This file has information about failed login attempt. Use the last command to view the btmp file. For example, “last -f /var/log/btmp | more”
  14. /var/log/cups – All printer and printing related log messages
  15. /var/log/anaconda.log – When you install Linux, all installation related messages are stored in this log file
  16. /var/log/yum.log – Contains information that is logged when a package is installed using yum. (Red Hat based systems)
  17. /var/log/cron – Whenever cron daemon (or anacreon) starts a cron job, it logs the information about the cron job in this file.
  18. /var/log/secure – Contains information related to authentication and authorization privileges. For example, sshd logs all the messages here, including unsuccessful login.
  19. /var/log/wtmp or /var/log/utmp – Contains login records. Using wtmp you can find out who is logged into the system. who command uses this file to display the information.
  20. /var/log/faillog – Contains user failed login attempt. Use faillog command to display the content of this file.

What goes inside to some of this files is controlled by rsyslog based on what is defined in the configuration file: /etc/rsyslog.conf

Try to edit it and you will see the files that where configured with all the specifications.

You can also use this tool to send the logs to any remote location.

*.info indicates that all logs with type INFO are logged.
mail.none,authpriv.none,cron.none indicates that those error messages are not logged into the /var/log/messages file.
You can also specify *.none, which indicates that none of the log messages is logged.

Other logs can be found in this folder depending on the applications that are running there.

This is a small example of the most used ones based on my experience.

  1. /var/log/httpd/ || /var/log/apache2 – Contains the apache web server access_log and error_log
  2. /var/log/lighttpd/ – Contains light HTTPD access_log and error_log
  3. /var/log/mail/ – This subdirectory has more logs from your mail server. For example, sendmail stores the collected mail statistics in /var/log/mail/statistics file
  4. /var/log/audit/ – Contains logs information stored by the Linux audit daemon (auditd).
  5. /var/log/setroubleshoot/ – SELinux uses setroubleshootd (SE Trouble Shoot Daemon) to notify about issues in the security context of files, and logs those information in this log file.
  6. /var/log/samba/ – Contains log information stored by samba, which is used to connect Windows to Linux.
  7. /var/log/sa/ – Contains the daily sar files that are collected by the sysstat package.
  8. /var/log/sssd/ – Use by system security services daemon that manage access to remote directories and authentication mechanisms.

Kali Linux, Raspberry PI and 64GB SD card not fully used…

I have installed the Kali Linux image for the fist time in a RaspberryPi to play a bit and understand what we can do with it…

I used a 64GB SD card but the image does not use all the available space on the SD card.
The official installation has a config that allow us to expand the disk so I guess we can use that to do the same in Kali.

How can I install the rasps-config tool?
What do I need to make it work correctly?

I have found this walk through to expand the disk, I hope it is useful to others.


wget http://archive.raspberrypi.org/debian/pool/main/r/raspi-config/raspi-config_20150131-1_all.deb
wget http://http.us.debian.org/debian/pool/main/t/triggerhappy/triggerhappy_0.3.4-2_armhf.deb
wget http://http.us.debian.org/debian/pool/main/l/lua5.1/lua5.1_5.1.5-7.1_armhf.deb
dpkg -i triggerhappy_0.3.4-2_armhf.deb
dpkg -i lua5.1_5.1.5-7.1_armhf.deb
dpkg -i raspi-config_20150131-1_all.deb
raspi-config

Send email using telnet

To test if our email server is working correctly we can use the following logic 🙂

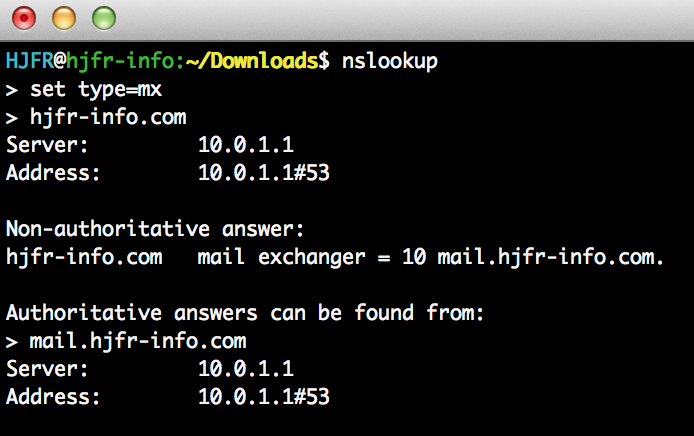
1 – If we do now have sure of what is our email server address we can check it easily using nslookp.

Normally has any website our email server has to have a name associated to a ip address. If we want to confirm if the name is resolving to the correct ip address we will need to do a nslookup query.

Use the following syntax to confirm if the server has the correct address.

    1. nslookup
    2. set type=mx
    3. write the name of our domain e.g.: hjfr-info.com
    4. the return will be the name of the email server e.g.: mail.hjfr-info.com
    5. exit

eg:nslookup1

After this we can use this name to connect via telnet or resolve the name to a ip address.

now to start a telnet connection to the server we only need to write this on the command line:

1 – telnet mail.hjfr-info.com 25

if the connection is successfully established you should see something like this:

telnet SMTP Server 1

Now it is possible to begin sending a email.

  1. greet the server with a: Helo
  2. Identify yourself: MAIL FROM: hjfr@hjfr-info.com
  3. Identify the destination: RCPT TO:hjfr@hjfr-info.com
  4. Identify the Data that you want to send: DATA and write the data
  5. end with a . (point and enter)

The telnet also can be used to verify other things on the SMTP server.

For example we have the commands VRFY and EXPN that might be used to identify valid users.

VRFY = This command will request that the receiving SMTP server verify that a given email username is valid. The SMTP server will reply with the login name of the user. 

ESPN = is similar to VRFY, except that when used with a distribution list, it will list all users on that list. This can be a bigger problem than the “VRFY” command since sites often have an alias such as “all”.